3.1.1 The 2D Moving Map
The 2D Moving Map shows (depending on your settings) "Vector" Chart Elements (such as Airports, Airspaces, Navaids, Fixes, Obstacles, Taxiways ...), Raster Charts (background images), terrain data (with warning colors if closer than 600ft), Points of Interest (city names, mountain names, etc.) as well as the current flight plan.
There are many different options available (e.g. dark / light (ICAO like) / Raster Charts / OpenStreetMap tiles / IFR / VFR / ...) .
Please go to Menu -> Setup -> Preferences to choose the desired style. A more detailed configuration is possible via the options button (2).
There are two general modes: Track up and north up mode (can be changed via (10)). In north up mode it is possible to move the Moving Map around, select chart elements and enter a flightplan via drag and drop.
A chart element (airport, navaid, ...) is selected either by hovering the selection cross (in the center) over it or by a long tap. A selected chart element then can be inserted into the flight plan.
In case of a long tap simply press on "Insert Fix" to automatically insert into the flight plan. In case of hovering press on P-> (7) and then "Insert Fix".
Instead of inserting you can also go directly to the selected destination or set up a procedure (e.g. an approach procedure with an extrapolated threshold). If you need to change the order of waypoints in your flightplan you can do this via the flightplan menu.
Another way to insert a waypoint into an existing flightplan is to drag the leg and drop it on an intermediate waypoint. To move a waypoint simply use drag and drop. To delete it simply drag it on the trash icon.
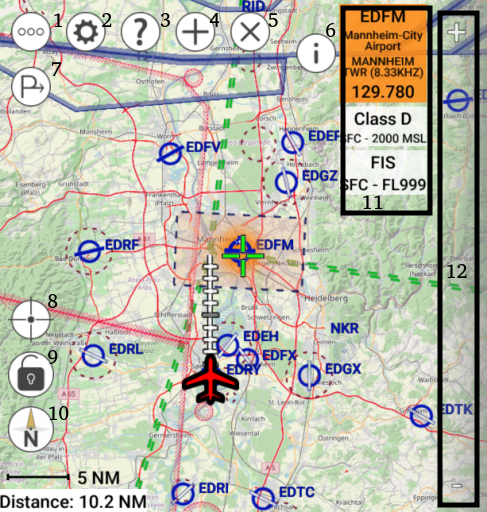 |
(1) Open / hide the menu (show / hide buttons 2-5) (2) Open the options menu (3) Show the help (4) Add a custom waypoint or chart element at the selected or the aircraft's position (5) Close the user interface (auto close after a few seconds) (6) Show information about the selected chart element. If multiple chart elements exist at the selected position they can be individually selected in the list (11) (7) Open the procedure dialog (for "Insert Fix", Direct, Approach Procedures, ...) for the selected chart element (8) Center the map (9) Lock the map to prevent accidental flight plan changes by drag and drop (10) Switch between north up and track up mode (11) List of chart elements available at the selected position. They can be individually selected. (12) Zoom in/out by swiping up/down on the right side of the screen or by pressing the + and - buttons. |
Please note: The appearance heavily depends on the installed data. To use all features it is recommended to download and install the aviation vector charts, terrain data, ground vector data, opensteetmap tiles and POIs. In case something is missing please install it via Menu -> Charts .
For some areas (currently USA only) VFR sectional (paper like) charts are additionally available. They can be installed via Menu -> Charts.